Showing posts with label repair. Show all posts

Sunday, November 14, 2021

How To Repair And Replace Toilet Flusher Handle / Flush Lever DIY Tutorial

If a toilet has a flush handle that extends out to one side of the tank and the handle sticks the problem usually isnt the handle itself but the flush mechanism that it operates. Unpackage new toilet flush handle assess parts.


How To Stop A Leaking Toilet 3 Effective Step By Step Steps Leaking Toilet Toilet Repair Toilet Tank

Replacing a toilet flush valve is a simple DIY that only takes a few minutes even for a person with negligible technical skills.

How to repair and replace toilet flusher handle / flush lever DIY tutorial. Grab your crescent wrench to tighten the nut but dont tighten too much or it could crack the porcelain. Remove the float mechanism from inside the cistern and open the valve to get at the seal. By bending the float arm downward the float ball will.

Like anything the toilet flush lever can get damaged or you may simply want to replace it to improve the appearance of your bathroom. Replace a broken toilet tank flush lever with a higher quality handle with these simple tips. Determine what hardware youll need for your toilet lever replacement.

The retaining nut inside the tank is a reverse thread. Discussion Starter 1 May 6 2013. It probably involves straightening the flush lever or adjusting the chain.

In this video Ill show you a quick and easy way How to repair and replace toilet bowl flusher handle. Unscrew lock nut from backside of the toilet lever and remove toilet lever from hole. Unlike my old toilet flush handle that basically consisted of just two parts my new called for a little assembly.

Once you have decided to discard the old handle you will need to replace the part. How To Replace A Toilet Flush Valve - DIY Plumbing - The Expert Plumber - YouTube. Then remove the old handle and lever slide the new handle into place and thread.

Replacing the flush lever is a far simpler and quicker job than you might imagine and it is well within the reach of most homeowners. Unscrew the bolt from the new handle using your screwdriver and then push the handle through the hole in the toilet. This is a really quick flush lever DIY tutorial that.

Feed the old toilet flusher handle out the front of the tank and dispose. Grip the seal and pull it gently out of the float valve. A toilet flush lever should last a long time but sometimes you may need to replace it.

Its the same process. The nut that holds the toilet handle lever in place is reverse threaded. Toilet repair fittings.

Should you ever need to replace your toilet flush ball fill valve or toilet handle then our selection of products. This seal is normally made of black rubber. This tutorial will help you change out the aesthetic in your bathroom by replacing your flush level with new hardware or you can fix a broken level.

The repair is seldom a complicated affair. Step 3 Replace the Handle. When satisfied with the operation of the flush lever replace the tank lid.

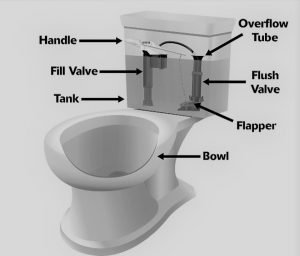
Put the nut on from inside the tank. Look up your existing brand name model and make to see what type of flush handle replacement will work. The mechanism is very simple and where adjustments to the water level are needed it is done by bending the float arm up or down to change the point at which the float ball shuts off the water supply.

Okay I thought replacing the flush handle would be a 5 minute job but when I pulled off the tank lid I found that the nut and bolt threads on the inside of the tank were encrusted with what Im assuming is limescale see pic. Its an easy repair but theres a trick to getting the flush handle out. An instruction manual and required tools are provided with the bought unit to help aid the replacement process.

Just insert the arm into the front hole of the tank and on in. Your bolt should screw on manually at first and then more tightly onto the base of the handle using the wrench. Most hardware stores sell universal toilet handles but you may need a specific variety.

So if youre in front of the toilet turn the nut to the left to loosen. Unscrew the float mechanism from the water supply valve outside the cistern using adjustable pliers. Install the new flusher handle.

Check other toilet parts such as the toilets mounting bolts and bolt caps. Hand tighten and then cinch down with your channel locks. Remove the metal nut from the new handle insert the arm into the hole in the toilet slide the nut back over the arm and use your fingers to turn the nut onto the handles base.

We stock a comprehensive range of toilet spares and fittings from leading brands. So youll need to turn it clockwise with your adjustable wrench to remove it. If yours is similar keep on reading otherwise you can see in the pictures how I disassembled the old toilet flush lever and basically just.

Successfully installing a new toilet handle can give you confidence to tackle other simple DIY plumbing projects. Then turn the new toilet flush handle nut counter-clockwise to install it. For example when a toilet continues to run after the flush cycle is completed it is usually because the water level is too high in the tank.

Ready to find the supplies for other projects like replacing seals gaskets and wax rings that you need in your local. Close the seat remove the tank lid turn off the water and empty the tank. Toilets go through an awful lot of wear and tear so its important to keep all the internal mechanisms working correctly.

Toilet Siphon Repair

Thereafter you can clean using vinegar bleach solution detergent a duct tape and scrubbing brush. Ideal Standard replacement siphons flush valves.


Pin On Products

The bowl holds the water and then it dips into the bowls outlet.

Toilet siphon repair. The siphonic design allows it to infuse a high volume of water stream and so we call it a Siphon toilet. If the toilet still flushes give the handle a flush to empty the water out of the cistern. Flush the toilet until all stored water has gone down the drain.

Factors affecting toilet siphon replacement cost. Remove the lid from the tank and drain any remaining water from the tank with a bucket. 50 out of 5 stars.

Get it Tuesday Aug 24 - Thursday Aug 26. NOT ALL MODELS ARE SHOWN ABOVE. RT A1320 Toilet Fill Valve Toilet Tank Parts Replacement Running Toilet Repair Kit Easy to Install High Performance Adjustable Height Quiet Fill Anti-Siphon 45 out of 5 stars 13 1699 16.

REPLACE A TOILET SiPHON a tutorial on how to replace or repair a broken toilet siphon diaphragm. Product Title Plumb Pak K830-14 Toilet Fill Valve Anti-Siphon Average rating. You have to clean everything including the toilet siphon.

There remains some extra water. Dudley Turbo 88 95 inch 2 Part Dual Flush Syphon WC Cistern DIY Toilet Repair. The job of a siphon jet is to hold the water until next flush.

Toilets usually lack flushing power because the waste pipe siphon jet or rim jets are partially clogged or the water level in the tank or bowl is too low. Buy toilet cistern parts seat fittings syphons flush handle fill valve more online. Replace the cistern onto the toilet bowl ensuring you have the sponge washer in place.

If your toilet syphon only needs a simple repair you can expect to pay your plumber for labour only. To clean toilet siphon jets start by inspecting your jets for signs of dirt using a mirror. Cleaning your toilet is not sufficient.

1 out of 5 stars based on 1 reviews 1 ratings Current Price 1512 15. If the syphon is not working at all you need to ladle the water out using a suitable container. If they are blocked you will need a thin sharp object like a piece of wire to scrape out the jet holes.

These siphons may appear to be different to any model you have fitted but they are all proven compatible replacements. Although less common a broken fill valve or a clogged vent system may be causing your weak flushing toilet. On average labour will set you back around 65 per hour depending on your plumbers going rate.

In those cases clear the blockage and adjust the system to correct the water levels. We supply a range of toilet spares fittings at Toolstation. Replace the siphon and follow the same steps backwards to get everything back in order.

To clean the toilet siphon you will need to get a hold of good quality white vinegar some sturdy duct tape and a scrubber. 12 List List Price 3297 32. Only 5 left in stock.

Replacement siphons for Ideal Standard WC toilet cisterns are listed below by model. Turn off the water supply to the toilet at the shut-off valve. A gravity toilet is the smartest edition from its predecessors.

Taking out and replacing a toilet syphon including the cost of materials will cost you on average about 10000 however depending on your circumstance on time how quickly you need the syphon to be replace and how awkward it is to replace the toilet syphon then expect to. Firstly turn off the water supply and flush your toilet to empty the tank. Toilet siphon comes with a molded pocket placed against the siphonic tube considered as a drain pipe.

Due to the flush valve the water from the tank flows into the toilet bowl. Before doing any repairs on both types of toilet it is important to turn off the water supply and empty the cistern. Scroll down to view products.

Insert the siphon into the cistern and replace the locking nut. By pulling or pushing the flush button or flush lever we flush the toilet. To get the last remaining water out of the bottom of the cistern you can use a sponge.

You can expect a repair to take no more than an hour. If needed use a sponge to remove the remaining water. Replace the diaphragm in the siphon housing and replace the coupling.

Friday, October 22, 2021

Geberit Toilet Repair And Maintenance

Geberit Twico 1 Impuls 250 valve fit and adjustment Replacing Geberit 280 and 250 Twico 1 and Twico 2 with the new 290 valve Fix a leaking Geberit toilet flush valve Flush Volume Adjustment for Geberit In-Wall toilets how to Geberit toilet repair and maintenance - How to Geberit Type 250 Flush Valve - Installation. The unique dual-flush valve saves water and is practically maintenance free.


Pin On Toilet Cistern In Wall Cistern Wc Flush Valve Filled Vavle

Get it Tomorrow Oct 30.

Geberit toilet repair and maintenance. Replacing a standard tank and toilet with the Geberit system results in more usable space improved hygiene and better accessibility. 50 out of 5 stars 13. Geberit Dual Flush Valve Manual Replacement.

Start 24 BlocFlush Blockiere Block flush. The spare part is supplied as a kit diaphragm insert cover and lever in one package. Actuator plate and WC can be cleaned without releasing a flush.

FREE Delivery by Amazon. Thanks to previous posters who all supplied tips 1. In the tank bore under the cap is the flush valve.

The function is deactivated. The specific flush in use has a bell with part number 240. By hiding the unsightly toilet tank.

Never open and repair the Geberit AquaClean yourself. Simple maintenance steps for Geberit Sigma in-wall toilet systems. If the mains connection cable is damaged it must be replaced by a skilled person.

Our service centre can ensure that these tools are repaired maintained and tested correctly. Repairs may only be carried out by a skilled person using original spare parts and accessories Do not modify the Geberit actuator plate Sigma80 or add any additional modules This document describes the maintenance of the following Geberit products. No flush is released.

We repair test and maintain all Geberit and Novopress tools. Sigma In-wall System Maintenance. BV Geberit Flush Valve 1.

It rarely fails and if this happens Geberit installation repair. Can I repair my Geberit product. All kinds of tools are used to process Mepla Mapress PE and Silent-db20.

Both buttons have a finger nail notch on the side. To repair an in-wall toilet system remove the flush actuator plate from the wall by lifting up slightly and tilting the plate away from the wall. Yes in most cases maintenance and repair may be performed quickly and easily.

Do not modify the unit or add any additional modules. Turn your finger so that your fingernail engages with the side of the other button. Turn off the water supply to the toilet and flush the toilet.

Removed cover checked water level wasnt too high and thus flowing into overflow pipe which is down the middle of the flush valve. Dig your nail into the notch and pull out the button. This will depressurize the PFl unit.

In the event of a blockage the silicone diaphragm and lever part can be easily removed without tools for cleaning. Repair fixtures in the installation video Geberit on the device and repair. Connection with the Geberit Service Handy.

The Geberit AquaClean must only be connected to a mains. The official repair and service centre for Geberit processed products with system warranty. This high-quality fittings ideal for most types of toilets.

01926 516800 Option 2 then Option 1 Email. MAINTENANCE MANUAL - Geberit Geberit WC flush controls are typically actuated automatically and touchlessly when the WC user leaves or by a hand motion near the visible IR sensor. In the event of a power failure manual actuation is also possible.

In the event of evidence of damage to th e Geberit AquaClean disconnect the unit from the mains immediately and contact Geberit Customer Service. Geberit Impuls 290 Dual Flush Toilet Valve Chrome Push Button 282350212 Multi-Colour. Remove the seven screws securing the cap and supply to the tank body and set the cap aside.

Operation and maintenance work may only be performed by the operator or user as described in this user manual. ScopeThis instructable is about fixing a specific symptom described below on a Geberit in-wall toilet flush with two separate buttons for flushing with a smaller or larger amount of water. Whats more they offer tool-free access to all the working parts of the system including the fill and flush valves should simple maintenance ever be necessary.

This will provide you with access to all working parts including the fill and flush valves. Hi just to recap how I solved this problem of water still trickling from concealed Geberit Kappa cistern into the toilet pan after flushing. Showing how to disassemble a Geberit in-wall toilet carrier tank for cleaning maintenance and repairTo remove the button panel push the panel slightly up.

Geberit also offers cable-controlled bath waste and overflows in a variety of designer finishes. The LED in the sensor window flashes in 3-second cycles. Geberit flush plates available in many attractive styles and finishes are the only visible element of the in-wall toilet tank and carrier system sometimes called a concealed cistern.

If you move house. Push one button down all the way and keep it down the toilet will flush. How to replace all the parts in a leaky toilet.

This includes disassembly and installation of a new fill assembly and flush valve. Pull the valve straight up and out. Geberit Impuls380 cistern inlet valve is maintenance friendly.

Function is cancelled upon re-establishing connection with the Geberit Service Handy. You can do this in your b. Modern installation systems from the Swiss firm Geberit most commonly used.

Geberit Toilet Flush Repair. Always use the current version of the installation manual for installing the device if the Geberit AquaClean has been removed eg.

Monday, September 27, 2021

How To Repair Conciled Tank

This is because not only we should be careful not to harm the toilet bowl when removing the toilet bolts we should also be cautious when removing and replacing the toilet bolts if they are rusted. After this you should be able to reach inside grab the flapper and carefully.


Fitting And Installation Of Concealed Cisterns For Wall Hung Toilets Wall Hung Toilet Toilet Design Toilet Installation

You can gently brush the parts under running water.

How to repair conciled tank. Many people crack their toilet tank when trying to place the toilet tank caplid back onto the tank. Before you can begin repairs its important to have a basic understanding of how your toilet tank works. The toilet tanks function is to hold a quantity of water until you flush the toilet at which time the water in the tank rushes down through an opening in the bottom of the tank and into the bowl forcing waste out of the bowl and into the homes drain and.

Carefully apply the epoxy onto the hairline crack both from the inside of the tank and onto the outside surface. Now we have enough space to access the flush valve clips and remove it from the tank. It is quite possible that a professional can fix the problem without having to remove the tiles which can save you a lot of headaches.

Here are the common sources of. Well-maintained tanks can last a long time and will not mar your landscape. Leave it to dry for the next 12 hours.

When the epoxy has dried get fine-grit sandpaper and sand the excess epoxy on the tanks exterior. Clean parts from calc buildup dirt sand small stones etc. Using a level move the bowl around until it is even.

Toilet Push Button Stuck This can lead to your cistern leaking back into the toilet so its an extension of the previous problem. Many homeowners consider them unsightly but they really only get that way if not properly cared for. Step 5 may not be necessary.

Grab the flushing mechanism see arrow and lift it up slightly then pull the whole thing out. If you want to go a step further here are five ways to conceal your propane tank. Turn the isolation valve which is usually marked with a blue yellow or red handle.

I am a builder and using Hind Ware products in my projects some time back I baught two no. The cistern is concealed behind the wall and can be accessed through the button panel for. Leakage into the bowl.

You can easily repair a leaking toilet tank by changing out the rubber gaskets around the tank bolts and the spud washer which can deteriorate and fail due to hard water and minerals. You will need to take out the fixing screws or take the cylinder itself off of the support brackets. If additional pressure closes off the tank and stops the toilet from running the flapper probably needs to be replaced.

Hind Ware Conceald flush tank. Replacing toilet bolts of a toilet is actually a much harder job than removing the toilet itself completely. To get into hidden places best and cheap way is to soak parts in a Citric acid solution.

Often they can be hidden in void. Remove it by locating and squeezing the latches. Hold it in place while tightening the bolts with the wrench.

Like any other moving part flappers wear out over a while eventually preventing them from sealing properly. Toilets are prone to cracking. It doesnt matter which situation replace toilet bolts without removing toilet.

How the Toilet Tank Works. Use 1 full teaspoon for every liter of water. If you just recently cracked your toilet theres no need to worry this happens all of the time and there are affordable ways to have it fixed.

Of CONCEALED FLUSH TANKS for my own house Iam facing continuous problems with them my plumber tried to fix them several times but no use we stopped using one bath room compleately. You will need a plumbers wrench for the large nuts that need to be loosened. Some concealed cisterns may have a debris plate that serves to protect against waste.

TOP 10 UNIQUE TOOLS FOR PLUMBERS WD 40 MULTI USE SPRAY httpsamznto2WmzCoeHeavy Duty G-Clamp httpsamznto2Ztij6MMulti socket wrench httpsamznto3. To firstly explain a recessedinduct concealed toilet cistern is one where the top tank part of the toilet is installed in the wall or behind a cabinetcavity and only the buttons are exposed on the tile wall. If these nuts happen to be corroded then it is a good idea to get a hacksaw to cut them out.

If the toilet bowl isnt level it can strain the connections and cause leaks or wear and tear. Leakage into the toilet bowl is usually due to a faulty component in the toilet tank. Answer 1 of 2.

Make sure you place the shank into the hollow cavity at the bottom of the toilet tankThis is where the other shank washer needs to be fixed on top of the threaded shank and be tightly pressed against the toilet tank. To replace the flapper start by turning off the water to your toilet and draining the toilet tank. The tanks are installed outside of your home.

To fix this remove the bolt caps and loosen the bolts on the sides of the toilet bowl with a wrench. Replacing the nut on the threaded shank to fix your toilet pump. This will stop the cold water flow.

When the tank is already dry get the repair kit and mix the epoxy as instructed.

Thursday, September 23, 2021

The Beast Toilet Repair

You dont have to worry if you drop it because it can withstand a fall. Adding to this WoodBridge includes a hand wrench tool to make tightening bolts in narrow and hard to each places easier.


Euroto Compact Elongated European Toilet One Piece Siphonic Toilet Seat Included Luxury Toilet Smart Toilet Bathroom Toilets

When it comes time to replace your toilet seat you may think that its as simple as finding one that fits.

The beast Toilet repair. From here youll want to push down on the plunger with swift thrusts creating. Shop now for great prices on faucets toilets valves fittings and hard to find plumbing parts. Expose the valve seal diaphragm washer by gripping the valve below the blue.

Your plumbing supply partner helping you grow your business. Close toilet seat and lid 3. It functions by depending on gravity to build a siphoning process to efficiently empty the toilet bowl.

Located in Palmyra PA we are proud to offer our service to both residents and businesses in Central Pennsylvania. Fixinela Scent cleaner for WC bowls washbasins wall tiles 500 ml 146 EUR. But there are actually a lot of styles and features available that can make your porcelain throne more comfortable and easier to use and clean in combo with good toilet cleaner and toilet brushesThe toilet seat makes up the toilet the way a bathroom faucet makes up the sink.

The cleaner is integrated into the wand or brush so theres no separate powder or spray to. How To Fix a Leaking Toilet - YouTube. It is mainly aimed at players who want to have all the different types of mods in one modpack.

Fixinela Perfekt Shower liquid cleaner 500 ml spray 192 EUR. Louis Jefferson St. Included with the purchased of this toilet is everything you need to get it up and running err flushing in no time at all.

It is less noisy durable and simple to repair. Elongated toilet bowls measure up to 31-inches from the wall behind the toilet to the front of the bowl. FTB Infinity was added to the launcher on February 5th 2015.

LICENSED - BONDED - INSURED. Lift out the large button 5. Most toilet clogs can be fixed using a plungerbut youll need a toilet plunger also called a flanged plunger or closet plunger not a cup plunger.

The white themed design of this toilet seat is great as it gives your bathroom an elegant and stylish look. Put the wax ring on the toilet and guide the toilet down over the bolts When you tighten thes bolts DO NOT OVERTIGHTEN only snug or you will break the toilet. Use a cross-headed screwdriver to remove the black plastic retaining screw 7.

Fixinela Ocean Toilet gel beast strength 750 ml 12 EUR. We offer affordable full service drain cleaning and replacement trenchless pipe repair pipe lining plumbing heating air conditioning and portable toilets. Press and hold down the small button 4.

Toilet cleaning systems are convenient all-in-one products that contain cleaner brush and storage. Power-assisted this system functions by using a motor to charge a blast of water into the bowl the moment you flush. Fixinela Ocean Toilet tablets urinal deodorant 40 pieces 1 kg 602 EUR.

This no-frills toilet from Glacier Bay was one of the best in our tests at flushing away solid and liquid waste. The cistern lid can now be removed 9. This toilet seat is suitable for commercial and residential use because it can support heavy loads.

The Dometic 301097506 is made with sturdy materials preventing a camper toilet repair. The beast Toilet repair Wall hung 1933 - YouTube. Round toilet bowls extend up to 28-inches from the wall.

We had to replace our old cast iron sewer lines underneath the basement floor and replace our sewer lateral. It is similar to Feed The Beast Resurrection in that both packs have similar mods. I told them my situation and got a call back within minutes of them opening up at 700AM by 830 am i had AJ at my front door to fix.

It is easy to clean and replace because the hinges make it possible to uninstall the toilet seat for cleaning or replacement. Remove the small button 6. To unclog your toilet insert the plunger into the toilet bowl at an angle allowing it to fill with water and then fit the cup over the drain opening in the bottom of the bowl.

This product is made with polyethylene construction making it tough and strong. Round bowls require less space making them a good toilet for small bathroomsRound bowls require less space making them a good. Consider a flushing toilet with this system for better results.

I called Beastbay Plumbing at 630 am and left a message on the voice mail regarding my toilets being backed up in Fairfield. Elongated bowls provide greater comfort while seated. It was a big job.

These bolts as described above are positioned in the slot of the flange and stick up a couple of inches. Lift out the button body 8. Contact us at 314-698-1154 for all of your plumbing services in St.

The Feed the Beast Infinity Evolved is a general all purpose modpack for Minecraft 1710. The toilet soft closing toilet seat already attached to the toilet wax rings floor bolts and a simple toilet installation guide. Layanan gratis Google secara instan menerjemahkan kata frasa dan halaman web antara bahasa Inggris dan lebih dari 100 bahasa lainnya.

Toilets with this system are very loud and expensive though they save a lot of water.

Thursday, September 16, 2021

Metropol Toilet Flush Leakage Repair

To fix a toilet that is leaking from the base you must replace the wax ring with another wax ring or rubber gasket. Why is my toilet occasionally leaking or running.


Sensor Flush Valve Installation Youtube

This may occur because the trip lever arm may be binding water may be overflowing into the flush valve overflow tube or the flush valve flappercanister seal may be worn.

Metropol toilet flush leakage repair. Now take a white rag or tissue paper and place it under the tank bolts. If the bolts are not tightly fixed the wax ring will not form a watertight seal. Videos you watch may be added to the TVs watch history and influence.

Unscrew the bolts on both sides of the base. An upstairs toilet that leaks when flushed will be noticed by water in the ceiling or in the basement. Toilet Flush System Leakage Repair.

Use the Sponge to Remove Excess Water. If there is leakage examine the tee bolts on both sides of the toilet bowl. After you close and fully open the water supply valve flush the toilet and see if your leak or the flush problem persists.

Undo the valve by unclipping the ears which hold it in place. They are usually covered with caps which you can remove with much ease. But if the problem persists you should attempt this final method.

If your toilet makes noise after you flush it means that the water is still running. Disconnect the water supply line from the toilet. Disconnect Water to the Toilet.

Unclip the strap connecting the handle to the flush valve so that the toilet flush valve can be removed. The most common problem associated with reproduction high cistern toilets is leakage where the flush tube connects to the tank on many reproduction units Gaylan especially the root of the problem is the use of a 2 x 1-12 reducing nut and washer on the standard 2 flush valve to connect the 1-12 flush tube. Taking out and replacing a toilet syphon including the cost of materials will cost you on average about 10000 however depending on your circumstance on time how quickly you need the syphon to be replace and how awkward it is to replace the toilet syphon then expect to.

The Floor Is Damp Around The Toilet. Easy method of metropole leakage repairMetropole leak repair karne ka asan tarika. Flush the tank and sponge out the rest of the water remaining in the bowl.

Lie down under the toilet and dry each of those areas with a paper towel. Another trick is to put food coloring into the toilet tank. The tee bolts are typically found on the left and right-hand sides of the toilet.

This repair should fix the problem. If the problem is still present turn the water supply off and flush the toilet to relieve the pressure in the Flushmate system. Glacier Bay Dual-Flush Toilet Slow Internal Leak and EASY 3 No-Tool Repair - YouTube.

How to Fix a Leaking Toilet Tank - Commode Tank Leak Repair. Grab the base of the toilet and not the tank and lift it. If the toilet doesnt leak then we proceed to re-connect the.

How to fix a toilet with a damaged or faulty flush. There Is A Smell Of Sewage. The Toilet Leaks From The Bottom Of The Tank.

With this issue toilets run or leak because water is leaking out of the tank. Heres everything you need to know about the situation and how to avoid dealing with it by simply calling us. Step 3 Check the Water Inlet Filter.

You can then turn on the shut-off valve. Remove the Red Seal. When your toilet flush stops operating or you observe water dripping from the tank things can quickly get out of hand.

Checking the Water Level to Stop Prevent Leaks. If playback doesnt begin shortly try restarting your device. Let us see how you replace a toilet wax ring.

You will see that the flush valve is made out of a piece of rubber and hinges upwards to open. Glacier Bay Dual-Flush Toilet Slow Internal Leak and EASY 3 No-Tool Repair. Look for the toilet.

Grab the toilet by the centre and push it gently from one side to the other to break the old wax seal. Take Apart the Flush Valve Float. If the color changes you know the toilet tank is leaking.

Place it on one side. If it leaks it will be necessary to disconnect the bowl again and re-seat the seal. Turn Off the Water at the Valve Below the Toilet.

Take a look at the flapper or toilet flush valve located at the bottom of the tank. Using a flashlight watch to see where the first drop of water develops. Checking the Flush Valve Seal.

This troubleshooting document relates to one or two-piece toilets. When your toilet leaks from the base when flushed you will need to remove the toilet in order to replace the wax ring which is causing the leaks. Put Everything Back Together.

Troubleshooting a weak flushing toilet is not complicated and in most cases its very inexpensive to fix. When the toilet tank is full you can test and see if the water doesnt leak from the tank after flushing the toilet. Step 2 Turn the Water Off and Flush the Toilet.

Fix Constantly Running Dual Flush Toilet Cistern By Replacing The Flush Valve Washer - YouTube. Empty the bucket of water into the toilet to perform a test flush and ensure that the new seal doesnt leak. The Floor Is Stained Around The Toilet.

Your Toilet Makes Noise. Toilets usually lack flushing power because the waste pipe siphon jet or rim jets are partially clogged or the water level in the tank or bowl is too.

Friday, September 10, 2021

How To Repair Broken Flash Tank WC

Check and make sure the tank water. To fix this remove the bolt caps and loosen the bolts on the sides of the toilet bowl with a wrench.


4 Ways To Fix A Leaky Toilet Tank Wikihow

After the porcelain adhesive has had time to bond and set carefully pick it up and place it back onto the toilet tank.

How to repair broken flash tank WC. You can use a hair dryer to speed up the process. It is clean water but still it makes a mess. Remove standing water in the tank or bowl if necessary by soaking it up with a sponge and wringing it out into a bucket.

Reattach the chain and flush or lift the flapper until the water drains from the tank to the bowl to complete the flush. Flush the toilet to drain water from the tank and bowl. The specific flush in use has a bell with part number 240.

The tank must be completely dry before you begin making any repairs. You can also use towels cups or anything else at your disposal to dry out the tank. Grind out a V or U-shaped valley along the entire length of the crack approximately 18 deep x 18 wide.

Wipe the porcelain dry. First things first turn the water off so that no more water can go into the tank. 3 The surface will need to be dry before the repair can be made.

Put back the broken piece if applicable. To fix a running toilet in both of these two toilets is ideally the same. Use a popsicle stick to.

2 Shut off the water and drain the tank by flushing the toilet. Most modern toilets use a flush button instead of a flushing lever. You can do this by lifting the ball cock out of the tank and shaking it.

Mix epoxy according to instructions and fill the crack. Leave it for around half an hour and come back to observe whether it has risen or fallen. ScopeThis instructable is about fixing a specific symptom described below on a Geberit in-wall toilet flush with two separate buttons for flushing with a smaller or larger amount of water.

Turn off the water supply to the toilet at the shutoff valve below the toilet tank. And unfortunately if the toilet doesnt flush then get a new flush valve or mechanism which is broken and replace it. Once the cistern is empty unclip the connection between the handle arm and the flush unit.

To determine which you will have to do a little more detective work. To Watch How a Toilet Flushes Check out this Quick Video. If the level of.

If the ball cock is full of water empty it and replace it if possible. Most tanks have a fill line marked on the side of the tank. Toilet tanks have a lot of water in them that can get everywhere.

Apply it inside the tank where it cannot be seen. Let the tank dry completely for several hours. Release the back nut under the cistern and pull the flush unit clear.

Step 3 - Replace the Toilet Tank Lid. If your toilet tank is broken you can flush with a bucket of water. You can call a.

On the inside of the tank they also look different. Consolidate the repair with fiberglass mesh tape. 4 Carefully follow the instructions for the repair kit and patch the crack.

Turn the valve clockwise until it stops. Geberit Toilet Flush Repair. This will remove any dirt and give the epoxy a maximum amount of surface to bond with.

While the specific tools will vary most repairs can be done using an adjustable wrench and a screwdriver. Also remove excess epoxy with a knife before it hardens. Draining the toilet tank is the first thing you want to do before working on a flush valve.

If need be flush the toilet to drain the water out of the tank. If you can clearly see any problems the next step in toilet tank repair is to fine tune the length of the lever chain and check that the ball cock is not waterlogged. If the toilet bowl isnt level it can strain the connections and cause leaks or wear and tear.

Shut off the water supply to the leaking toilet and mark the water level inside the tank. Flush lever toilet tanks have a floating ball or a floating cup while flush button toilet tanks have a floating cup. Turn off the water supply to the toilet first.

Pour at least 1 12 gallons into the bowl all at once to initiate siphoning and empty it. The broken piece goes back into original position making sure the excess epoxy oozes out of the crack. 3 Clear a space around the toilet bowl removing rugs books and anything.

Hold it in place while tightening the bolts with the wrench. How to Manually Flush a. A split diaphragm can be replaced by turning off the water to the cistern flushing the toilet and soaking up any remaining water with a sponge.

Using a level move the bowl around until it is even. Be very careful not to bump the edges or to drop it harshly into place otherwise it will break and you will have a bigger repair issue than what you originally started with. However if your toilet is older and has rusted bolts on it you may also need a pair of vice grips to help you break them loose before you can remove them with your wrench.

Clean the mineral deposits and if the toilet flushes then reattach the cover of the tank in reverse order and secure it by screwing the knob.

Friday, September 3, 2021

Concealed Flush Tank Repairing L Flush Tank Repair

Turn off the water supply if you havent already. Complete process to fix the continues water leakage from wc flush tankto watch morehttpsyoutubefyXMC0jKY_0Music provided by Vlog.


1650 Get Latest Price.

Concealed Flush Tank repairing l flush tank repair. To fix this remove the bolt caps and loosen the bolts on the sides of the toilet bowl with a wrench. How to install flush tanks. It is fixed on the backside using a gray holder which you will have to take off first.

Using a level move the bowl around until it is even. Conceal flush tank ball cock repairing kayse kare full guide - YouTube. WC dual flush Repair.

A-36 Sector 83 Noida Uttar Pradesh Noida - 201305 Dist. Bend the float arm down to shut off the water. There are a few common ways to fix a leaking toilet cistern to restore its operation and prevent the problem from escalating.

Hold it in place while tightening the bolts with the wrench. Take a look at the flapper or toilet flush valve located at the bottom of the tank. R C Plasto Tanks Pipes Private Limited.

Use wash cloth or towel to get rid of all the water after flushing several times to completely drain the tank. Turn on the water supply let the tank fill up then check the flush operation. Concealed cistern flush tank installation for toilet - YouTube.

Concealed cistern Flush tank repairin hindi - YouTube. Repairing the flush valve Located in the middle of tanks the flush valve is one of the main components of the leaking toilet cistern and operates with a float ball. You will see that the flush valve is made out of a piece of rubber and hinges upwards to open.

If playback doesnt begin shortly try. How to fix a leaking toilet tank. After that check the flapper.

Reinstall the frame if it is loose. If the toilet bowl isnt level it can strain the connections and cause leaks or wear and tear. This wont be possible with all installations and even in this case it can be difficult to actually see all the parts.

Repairing of flush tanks. Conceal flush tank ball cock repairing kayse kare full guide. Concealed cistern flush tank installation for toilet Kalhari Slime Line Single Flush Tank Fix Constantly Running Dual Flush Toilet Cistern By Replacing The Flush Valve Washer.

Process of installing flush tanks. In my case there is a convenient valve top left blue for this purpose inside the tank. Replacing a concealed Cistern Flush Pipe.

Dont forget to stop the water line to the toilet tank. If you need to adjust the chain length to achieve proper operation do it now. Kindle White Eco Dual Flush Tank For Toilet Model NameNumber.

White Single Flush Vectus Pro Cistern Tank For Toilet. Installation of flush tanks. When operating properly the flapper will lift up and the fill cup will tilt back to fill with water when the flush handle is pressed.

Verify that the lift rods engage with the flush assembly. White Plasto Flush Tank. GEBERIT concealed flush tank leakage repair - YouTube.

Tap to unmute. Verify that the frame around the flush button is securely in place. Undo the valve by unclipping the ears which hold it in place.

If it is loose the buttons may not fully actuate the flush. PUREFLOW SOLUTIONS PRIVATE LIMITED. The other option is to remove a few tiles in order to access the concealed.

PURE FLOW WHITEIVORY GOLD STYLE SIDE HANDLE FLUSH TANK For Toilet Model NameNumber. Concealed flush tank Jyoti Traders Akota Vadodara Shrenik Park Char Rasta Shop No 4 Akota Stadium Road Hari Om Complex Akota Vadodara - 390020 Dist. Gautam Budh Nagar Uttar Pradesh.

Unclip the strap connecting the handle to the flush valve so that the toilet flush valve can be removed. If youre lucky you can remove the push flush button entirely and have a look inside. Adjust the U-clips to reduce any system slack.

Replacing a concealed Cistern Flush Pipe - YouTube. Extract the bell from the tank. Leading Supplier TrustSEAL Verified.

Use a plunger and auger to. Noida Uttar Pradesh Noida Dist. Contact Supplier Request a quote.

How to repair a toilet cistern. Concealed cistern flush tank installation for toilet. Plasto White Red Flush Tank for Toilet.

Wednesday, August 25, 2021

How To Repair Toilet Shower

If playback doesnt begin shortly try. Add a Flange Support or Replace Part of the Floor.


Pin On Bathroom

Fix Toilet Tank Cracks or Replace the Tank.

How to repair toilet shower. You can also stop your toilet backing up into tub by rinsing the drain with a solution of baking soda and vinegar. Home Depot says to place it on top of the flange lower the toilet base onto the O-ring over the mounting bots tighten the nuts to lock the toilet in place attach the flexible water hose turn. If your shower or toilet is clogged all you have to do is drop someone on the clogged item so that they know there is a problem and then take the person to the laundry room and drop them on the.

You might need to do this a few times to completely fix the problem. I applied the toilet bowl cleaner to the sides of the tub just like you would in a toilet and let it sit for a few minutes. But if you are installing shower enclosure directly where toilet used to be and you can get a reasonable fall into the soil pipe all will be ok.

Add an Extender Ring Above the Flange. If it aint broke fix it till it is. How to Fix a Toilet that Backs Up into a ShowerBathtub.

Replace a Broken Flange. A lot depends on where your soil pipe runs ie above or below floor level etc. Toilets also leak due to faulty flappers pipe leaks and condensation.

Toilet Repairs - YouTube. To fix the leaking toilet fill valve tighten the lock nut clean and unclog it or simply replace it. Needless to stay you can live in a house where every time you flush the toilet the waste backs up through the tub or shower drain.

A leaking toilet fill valve is caused by a loose lock nut mineral deposits a clogged valve or an old and damaged fill valve. The main sewer line can become clogged and cause backups in the smaller lines. Finding out what is the problem isnt complicated at all.

Lift off the Tank Cover. Pour a bit of bleach and vinegar into a bottle mix it and then water down the solution heavily. Fix the Leaking Shutoff Valve.

The tub was dry at the time. Pour one cup of baking soda directly down your shower drain and then follow it up with a cup of vinegar. Everyone has plunged their toilet before but plunging to fix a gurgle is a bit different.

Fix clog toilet and the water backs up into the bathtub or shower drains - YouTube. You will need to fix it and fast. How to Fix a Clogged Shower Toilet.

If your toilet trap or drainpipe was clogged by toilet paper or bar of soap the hot water will help break the clog into smaller pieces and in the process unclog the toilet improving its draining rate. The air needs to escape through your toilet when you plunge so it can bring up any clog with it. Since the mid-1990s housing codes have phased out old-style shower valves in favor of anti-scald valves that protect you when a.

Before fixing a toilet flusher its important that you find the problem first. How to Fix a Shower That Gets Hotter When a Toilet Is Flushed. Use the solution and the wire to scrape off the obstructions.

Take Action To Fix. Clear The Air Clear The Air. After a few minutes I scrubbed it off with a scrubbing sponge as you would do with a toilet.

Even partial clogs could cause visible backups in the main sewer lines connecting to your toilet or shower. The solution depends on whats causing the problem. Replace the Toilet Seat.

A backup of this nature may indicate a clog in the main sewer line that all of your plumbing drains into so sinks and washers eventually will back up too. After youre done clean the jet holes and the bowl using a toilet cleaner. Fix or Replace the Shank Gasket.

Before you plunge you need to seal off nearby drains to keep the air from escaping that way. Use a Toilet Plunger. First look out for any leaks.

The solution might be an easy one or a very complicated and expensive one depending on what is clogging your drain. Fix or Replace the Wax Ring. Use duct tape to seal off your sinks tub etc.

Once you find any leaking youll easily understand whats causing the problem. Sewage backing up from the toilet into the shower is obviously a problem you must fix immediately. Look Out for Leaks.

Fixing a clogged shower and toilet is something you can do in a few different ways depending on the nature of. Grab some bleach vinegar and a wire or an old toothbrush. 2 How to Fix Toilet Leaks.

You Can Snake It Up.

Monday, August 23, 2021

Toilet Leaking Sloan Valve Repair

Over time the vacuum breaker can become brittle and begin leaking and will. The same fix works for both.


3 Pack Flushline Replacement Sloan 33996 A 38 A 3 5 Gpf Drop In Repair Kit In 2021 Toilet Repair Repair Plumbing Repair

Rotate the water control screw clockwise if the water level is too high.

Toilet leaking sloan valve repair. Remove the ceramic cover from the tank on the back of the toilet. Water leaking from threads beneath flushometer cover. Sloan Valve Company 10500 Seymour Avenue Franklin Park IL.

From spec sheets to pricing drawings to repairs find all the details you need to specify Sloan flushometers sinks faucets toilets urinals and other plumbing fixtures. Install Sloan handle repair kit B-50-A. Open the water supply valve ush the toilet several times and check for leaks at the connections and the base of the tank.

Repair Kit for V-101-A Vacuum Breaker with 1-12 Female IP. Use light steady pressure so you dont damage the water lines. Sloan Valve Company warrants its.

Use ONLY soap and water then wipe dry with a clean towel or cloth. Turn off the water supply valve and flush the toilet to relieve the pressure. Visit our site now to order what you need quickly.

The very easy fix for the Sloan Flushmate Noise. It will run down the sides into the bottom of the ceramic tank. Unclip the strap connecting the handle to the flush valve so that the toilet flush valve can be removed.

Turn off the water to the Sloan valve by rotating the slot in the valve clockwise until it stops using a flat-head screwdriver. Fill a one-gallon jug with water. Take a look at the flapper or toilet flush valve located at the bottom of the tank.

If desired place a bead of caulk not supplied. If your problem is solved replace the toilet tank cover. Use our troubleshooting guides for help identifying the plumbing parts needed to complete your repairs.

Technical Downloads for Restroom Fixtures Sloan. Commercial Toilet Sloan Flush Valve Replacement If you like these videos and would like to support this channel Any purchase that you make here will help a. If the problem leak continues you must investigate your Sloan Flushmate.

The water supply requires to be reconnected. It only leaks as the flush is ending and it stops leaking after the flush is. Do not use abrasive or chemical cleaners to clean flushometer that may dull the luster and attack the chrome or decorative finish.

Sloan H541ASD repair kit Sloan H543ASD repair kit Control Stop Leak Symptom Cause Solution Leaking from control stop adjustment screw. Push down on the flush handle to ensure the water supply is off. Tighten the packing nut on the toilet shutoff valve one-eighth turn clockwise to try to seal a leak around the nut.

Rotate the water control screw. Usually this issue happens when the wax ring that seals the toilet base. INSTALLING NEW TOILET BOWL.

Toilet sloan flushometer valve repairreplacement. Wait for the urinal to fill. A Sloan Flushometer flush valve works primarily with high water pressure and.

Toilet leaking sloan valve repair Home depot michigan. You will see that the flush valve is made out of a piece of rubber and hinges upwards to open. If not you might have to call in a professional to help you out.

Undo the valve by unclipping the ears which hold it in place. Find Sloan flush valves faucets china repair parts tools and accessories easily with the high-quality product photos and full descriptions on our website. On flush-handle fixtures disengage the Flush Rod from the handle linkage and flip it away from the Flush Valve Cartridge.

Wrap cloth or masking tape on the pliers jaws to protect the nuts finish. Flush the toilet and make sure everything is under control. Place a large rag in the closet flange.

Locate the water control screw. Give the toilet a flush to see if you still have a leak problem in the Flushmate tank. If you notice water leaking from the water supply shank you can try tightening the supply shank locknut to see if it cures the leak problem.

Inspect the toilet intently for any leaks. Just pour it over the top of the black plastic Flushmate container. If playback doesnt.

This is located to the right of the flush valve on the back of the urinal flush handle. Tighten the Packing Nut. Turn on the water and allow the Flushmate system to refill and pressurize.

Fortunately both these problems are very easy to cure. When water is around the base of the toilet. Vacuum Breaker Kit V-362-A 3322277 Discontinued.

Pour the water into the toilet tank. When you see water around the base of your toilet try to determine the source of the leak first. Toilet sloan flushometer valve repairreplacement - YouTube.

Toilet leaking sloan valve repair - YouTube. Replacing is the only solution to this problem and a wax ring needs to open for this.

Tuesday, August 17, 2021

How To Repair Slow Filling Toilet

Replacement valves are available at various retail outlets nationwide. A partially closed valve restricts the flow of water to the tank contributing to slow filling.


Toilet Tank And Bowl Slow To Refill How To Fix Slow Fill Up Water After Flushing Your Toilet Youtube Toilet Tank Flushing Fix It

Next pour a drain cleaning product into the toilet bowl.

How to repair slow filling toilet. In times when flushing the sediments does not work. Check the water valve. Reach inside the tank with your right hand under the float cup and lift it up.

Toilet tank and bowl slow to refill. How to fix a slow filling toilet tank. Your next option is to repair or even outrightly replacing the valve.

With your right hand hold onto the gray shaft keeping the float cup all the way up. Toilet flushes slow but not clogged. If your toilet is slow to fill chances are the inlet valve diaphragm is blocked or distortedIt easy to clean the inlet va.

If your toilet is not filling properly or is filling slowly this guide should be of help. In certain situations you may need to consider hiring a licensed plumber to help you. Learn how to fix your toilet filling slowly - Video and step-by-step instructions below.

How to fix a slow filling toilet tank. After that turn the water tank on and let the parts soak for 5 to 7 hours and then flush. Damaged fill tube also can be the reason for the problem.

Another common issue that can cause your toilet to fill slowly is a clog in the valve tube. Flushing of the toilet can also become slow if the quantity of water is low in the tank. To fix this issue you will need to shut off your water and unhook your valve tube from your toilet making sure that it is over a cup or bucket to catch any water still in the line.

All in all fixing a tank that is filling up slowly can be pretty easy when you know where to begin. Check for clogs in the valves and tubes. If the tank is filling slowly even when the water supply valve is open turn off the water supply and unhook it.

Now that you have a better idea what may be causing your toilet tank to fill slowly here are actual steps you can take to fix the problem. If it is only partially open the water may be restricted. Evaluate the water pressure coming into your house.

Adjust your float ball or fill valve. Also ensure the water supply line the hose connected to your toilet that runs to the wall or floor is opened all the way. How to fix a slow filling or broken toilet - YouTube.

Turn the water supply valve counter-clockwise to make sure it is fully open. Realign your trip assembly. How to repair slow filling toilet - YouTube.

Wear some gloves and take a toothbrush with vinegar on it and clean all the toilet components to make sure its all squeaky clean. Sometimes after you flush the toilet it refills with water and then slowly drains. Add dish washing liquid to the.

If when you look inside your toilet tank you notice that the float ball is very low only in the bottom third or half of your tank you can adjust it. Choose from the following options. There are several things you can check to get to the root of the issue.

Check the valve to make sure that its open all the way. How to Fix a Slow Filling Toilet Tank. The toilet flushes slow but is not clogged the reason for this problem must be your flush might have a partial blockage in its pipe.

To fix a slow toilet caused by a clogged drain start by pouring a bucket of hot water into the toilet bowl. Steps for removing the top cap and flushing out debris from the fill valve. How to fix a slow filling toilet.

How to FIX slow fill up water after flushing your toilet. This can increase water flow to the tank and speed up filling. Sometimes the water supply valve might be only partially open.

How To Fix A Slow Filling Toilet Tank. This video will show you how to repair a fluidmaster toilet fill valve that is slow to fill the toilet tank. Turn off water supply and flush the tank.

If those tricks dont work Go ahead and call a. On the other hand fixing this issue may be as simple as swapping a tiny piece like the float ball. Open the Water Supply Valve.

How to Fix a Slow-Filling Toilet. Repairing parts and using a replacement valve. Adjust the Fill Valve.

Bathroom Leaking To Floor Below/bathroom Leaking Repair

But whenever I kid spills some water or if some water leaks i can see the water leaks in the basement ceiling right below the bathroom. How to Fix Bathroom Faucet Leaking at Base.


Shower Leaks Cause Unsightly Damages A Leak In Your Shower Can Do More Than Waste Water And Cost You Money It May Leak Repair Ceiling Leak Bathtub Leaking

Put Everything Back Together.

Bathroom leaking to floor below/bathroom leaking repair. A fix is usually as simple as removing the commode and replacing the wax ring. Shut Off the Faucets Water Supply. The leak may be coming from a loose connection between the base of the toilet and the waste pipe in the floor.

Bathtubs can also be the culprit of the water stains on the ceiling. Place a plastic tarp under the leak even if its not actively leaking. It would help if you repaired the bathroom floor in this case.

Then turn on the water when you are checking the line for the drips. Loosen the Valve from the Faucet Body. Our plumber will be there soon to fix.

You must unseat the toilet scrape off the old wax ring and inspect the floor flange for damage. A leaking shower can occur from different areas such as the level below walls bathroom entrance or even other surrounding areas. How to find water leaks under a floor if you are asking yourself this you will need help.

Place a bucket or something larger on top of the tarp under the leak even if its not actively leaking. This is because in addition to repairing the leak youll be paying for a new ceiling replastering redecorating replacing bathroom furniture flooring and any other possessions that may have been soaked. Bathroom leaking problem5litter acid 32pharma latex SBRwhite cement plz support.

For more detail we also give you a video that shows the steps in fixing the water leaking under the bathroom. Leaking bathtubs need to be repaired to avoid damage to the tub or wood below. Hence if you see the floor crack or stain up without any reason hidden leaks might be the reason.

Hopefully our article can give you a clear guide to fix the problem. A leak means that excessive water is penetrating through the tiles to the weakest point. Not least because many homes today are covered with expensive floor coverings and any miss-diagnosis can mean costly mistakes.

Be sure that you have a pot or a bucket handy to catch the water and be careful that the ceiling doesnt collapse on you. You may not have realized it but every time you flushed that toilet youd have been causing water to penetrate through the bathroom floor and into your downstairs ceiling. The repair procedure may vary depending on the tile condition.

A ceiling leak can also be caused by leaks. It doesnt feel good if it leaks like this even for a. Water leaking from an upstairs bathroom to the downstairs is especially concerning because it can result in these serious problems.

The bathroom floor might be cracked that gives space to water and it starts leaking from the ceiling. Find the O-rings and Pull Them Off. A bathroom floor is designed to withstand the odd pool of water.

For fixing it you can run your fingers over the lines to find the damp parts. You then need to replace the wax ring. If youve eliminated all other causes of leaks the next step is to cut out a small access hole in the ceiling below.

If you suspect that a defective ring is the issue flush the toilet and check to see if water leaks out at the base of the commode. Otherwise the toilet could leak again in the future. The pipes directly underneath could be leaking or the water may have trickled down from another compromised area near the floor.

Damage to bathroom floors including tile and subflooring Warped tiles and stains in ceilings below the bathroom. Cut out the section of ceiling drywall where you see the evidence of the leak. We recently moved to a 35yr old house but the bathroom tile and kitchen tile are remodeled.

Always seat your toilets so they dont rock in any direction. Patch up your bathtub with help from an experienced contractor in this free vi. For example if your leak has brought down the ceiling in the room below you can expect to end up with a bill for thousands.

If you see the ceiling sagging below the bathroom you can prevent the collapse of the ceiling and further damage by poking a small hole in the ceiling drywall. You should check the gaps between the seals of the pipes and make them tight to fix the issue. Remove the Screw Cap Handle.

Replace the Faucets Internal O-Ring. Pop the Faucet Handle Cap Off. The last thing any homeowner will want is to start randomly lifting floor coverings and floorboards on a search and hope mission.

Wednesday, August 11, 2021

Bathroom Floor Repair

Porous materials can absorb stains but a thorough cleaning and a coat of sealant can repair the damage. Floor Repair vs.


Before Older Wood Frame Homes Do Suffer From Subfloor Damage Through The Years Replaced Subfloor In The Next Photo Flooring Bathroom Flooring Repair

If youre not comfortable with doing all of these tasks you should defer to a.

Bathroom floor repair. Large Rotten Area Generally runs about. Bi Adhesives Repair Paste Floor Tile Marble Scratch Restoration Filler Washbasin New Grout Bathtub Wall Mending Agent Sho México. Harder materials like ceramic and stone tiles can be individually replaced.

How to Repair Replace Rotted Bathroom Subfloor Flooring. Start by chiseling and cleaning the cracked area so the mortar bonds better. Use a pencil and a straightedge to draw a line through the middle of each neighboring joist and use a carpenters square to connect those lines creating a.

All Our Work Is Guaranteed. To ensure our content is always up-to-date with current information best practices and professional advice articles are routinely reviewed by industry experts with years of hands-on experience. If the water damaged bathroom floor happens to be on an upper level ceilings in rooms below may also be affected.

Youll spend 800 to 20000 on replacements depending on the layer youre fixing or replacing. How To Lay Tile Install A Ceramic Floor In The Bathroom Diy Family Handyman. How to choose the right subfloor esb flooring replacing bathroom floor image of and closet replace bathroom subfloor image of and closet how do you replace a subfloor with by pictures bestlife52 rotten subfloor under bathtub and plumbing wall doityourself munity forums.

We can install or repair most types of flooring. How To Repair A Rotted Bathroom Floor By Maemin September 16 2021 To replace plywood subfloor replacing rotted wood flooring in a repair dry rot on a hardwood floor soggy rotten bathroom sub floor hanging cement board drywall fixing. Budget Dumpster does suggest that a musty smell soft spots when you walk or floors that bubble up likely require subfloor replacement as well.

Shop Jeffs favorite tools and great products and help support our nex. Replace damaged portions of the flooring with identical materials. Luxury Vinyl Tile Floors.

In a bathroom with otherwise bargain-level flooring splurging on one or two nice rugs can make all the difference in the world. Before you worry about replacing your floors contact a repair company that can. Inspect the damaged areas and give you viable alternatives.

Repairing a Water Damaged Bathroom Floor The sink bathtub shower stall toilet and associated pipes and connections are usual suspects if and when it happens. Temperature changes heavy weights and dropped objects can all damage your concrete floor by causing cracks and holes. Replacing Your Bathroom Flooring Written by Matthew Kolas on Jan 29 2010.

Then mix the repair. Hi you could make a temp frame to support the bath in order to take the boards out you might be best replacing all the floor in the bathroom With new boards so it all runs through hope this helps somewhat. Medium Rotten Area Generally runs about.

With the dampness and abundancy of water the flooring can become warped and worn. Partical Board to match the height of the floor outside bathroom. Sander or Sanding Block.

Replacement Costs Depending on the layer youre fixing itll run anywhere from 150 to 800 to repair your floors. Take a look at the floor joists and figure out which ones are on either side of the water-damaged area. Fortunately patching damaged concrete is an easy task.

When you replace the top-level floor surface youll likely also need to replace the subfloor and possibly even the floor joists beneath depending on the extent of the damage. Handyman handles everything from repairs to grout cleaning and complete tear-outs. Small Rotten Area Generally runs about.

Water damage is ugly but it can be fixed with the right tools and the right approach. Our professionals are here to solve our bathroom flooring challenges. Drill battery or electric Phillips Bit holder.

If you have some space put a nice rug at the entrance of your bathroomitll set the tone for the rest of the room and you wont have to replace or repaint the entire floor. Inspect the area. Dont Put It Off Any Longer It Only Gets Worse.

Bathrooms in particular are at greater risk of water damage than most other rooms in the house and when wood gets wet it becomes prone to rotting. Whether you need help in your bathroom kitchen entryway basement laundry room or anywhere else our home improvement professionals will arrive at your home with all the tiling tools and equipment they need to get the job done right. Rotting Bathroom floors can pose a serious risk to the safety of you your family and the structural integrity of your home.

Tile Installation Repairs. Flooring repairs and upgrades in your bathroom can be common.

Thursday, August 5, 2021

Concealed Dual Flush Repair. Continuous Water Leakage Fixed

Most of the fixes above on how to fix a dual flush toilet are easy to do by anyone without any specialized help. Make sure before replacing the flush valve seal that the seat which the seal pushes against to seal off the water is not pitted or cracked and that it is free from scale build-up.


Why Does This Toilet Fill Valve Leak Around The Top Home Improvement Stack Exchange

If the flush ball is not sealing properly replace it.

Concealed dual flush repair. continuous water leakage fixed. Open inlet valve to cistern and use the incoming water to wash any debris out of bottom of cistern and into pan use a sponge if bits of limescale at base of cistern. Take the top off and play with the lever that reacts to the water level and shuts off the inlet valve. The flapper or seal is often the culprit in constant running water in both normal and dual flush toilets.

You must know this if you want to know how to fix a leaking Caroma dual flush toilet cistern. Connect the 2x air hoses to the actuation plate. Over time this rubber piece may become brittle or simply misaligned.

Remove the toilet tank lid and place it away in a safe place. Gently rock the Duo Flush canister away from the overflow pipe and pull up. Check for any signs of leaks if there are leaks then check that the flush valve is seated correctly and is blocking the hole where the water runs out.

Fix Constantly Running Dual Flush Toilet Cistern By Replacing The Flush Valve Washer - YouTube. Make sure it does not leak. It is fixed on the backside using a gray holder which you will have to take off first.

The plastic base was the trickiest to remove. Spoke to Ideal Standard who sent me a new outlet diaphragm. Extract the bell from the tank.

A simple washerseal replacement can often be p. Turn on water supply. I did all this and everything seemed fixed then it started leaking worse than ever.

Id assumed it was a faulty inlet valve seal so I fitted a new one but this leaked as well. Turn this valve clockwise. Turn on water and flush toilet to ensure problem has been resolved.

How to Fix a Running toilet. To check it turn off the water supply and flush the toilet to completely empty it of water. When flushed water poured out of the the supplied rubber internal washer which seals the flush pipe to the pan.

I followed the instructions for the Macdee dual flush concealed cistern. I had the problem where after flushing the toilet the cistern re-filled and the water inlet valve would shut off OK but after a few minutes would start to dribble continuously. Let us see how to fix or replace a dual flush seal.

Reverse steps to place top back on the valve. At the hinge there should be a screw which you can adjust this will shut the water off before it. Install the plate frame.

Remove any remaining water. Did he ever resolve this. Removing the Duo Flush valve from the seat.

Twist or unclip the flush and remove from the base of the cistern rinse the bottom of it in the basin with warm water and clean any limescale off of rubber seals. If there is some scale on the seat gently remove it with a hard plastic object like the. Check that the chain isnt too tight against the valve as this will prevent the valve from.

Make sure that the replacement value is aligned properly with the holes. The water hose iron thing again see above I removed the piece that startsstops water flow with the floater was on the left no picuture and gently set it down inside. An Ideal Standard dual flush constantly trickling into the bowl.

Before you start any repairs remember to turn off the water supply. Using a cup hold the cup upside down over the exposed opening of the valve and turn on the water supply full force for 10-15 seconds. The push button should screw of when that is of you can just lift the lid of you may need a new ball valve as I suspect the water level is getting to high and is going through the overflow and will cause the water constantly running into the pan.

Steps To Fix The Caroma Dual Flush Toilet Cistern. I have the same maketype of toilet and the same problem. Ideal Standard dual flush constant leak into pan.

Connect the water supply hose. Look inside valve to ensure no debris is left inside the valve. Get hold of the Dual Flush Valve which is the big thing in the middle twist it anti-clockwise and it should come off in your hand Pull it out and check the rubber thick black washer 9 out of 10.

Step 5 - Turn Water On. Replace Duo Flush onto valve seat and turn on water check for leaks. Clean it off really good under a faucet then reattach it - again a struggle.

In my case there is a convenient valve top left blue for this purpose inside the tank. The toilet shut off valve is located on the wall behind the toilet. Switch the water supply on to the toilet and allow the toilet to fill up again.

Fitted this but the problem persists. If it is worn misshapen or dirty it may need to be replaced. There are some steps that you can follow to make the necessary repairs.

The valve in question is Geberit 240638001 Dual Flush Valve for UP200 Concealed Cistern Duofix Frame. This video looks at the fix for the three main reasons that water leaks into the toilet pan from the cistern. I then bought a new nylon washer which I had to immerse in boiling water in order to get it on to the pipe.

Also check the flush valve. Check out the steps listed below to know how to fix a leaking Caroma dual flush toilet cistern. One side had a mechanism the other side neede to slide up but needed some force.

One last tip Now that you have everything opened and fixed before putting everything back together consider adding a bottle of descaler to your tank and leaving it to work for 12h before flushing. Install the actuation plate to the frame. Make sure the sleeve is aligned properly or the water wont flow when you turn it on again happened to me.

Turn off the water supply if you havent already. Turn off the water supply to the toilet. Make sure hoses are not bent and its path is clear.

Removing the activation box both newer and older versions of the converter once it. Flush the toilet and hold the flush lever down to remove as much water as possible from the toilet tank. Sam posted a query Nov.

Wednesday, July 28, 2021

How To Repair Metropole Valve Easily

Remove it from the water bath and deflate it. This video demonstrates one method for quickly and easily replacing an irrigation valve in your sprinkler system.


Squarefoot 40 Mm Push Valve Flush Valve Dial Flush Internal Spindle Cartridge Kit Suitable For Jaquar Metropole Push Valve Amazon In Home Improvement

While the sound of running water can be extremely annoying a leaky fill valve may also cost you quite a bit of money and really rack up the charges on your water bill.

How to repair metropole valve easily. Before you assume that the valve is stuck check to see if there are burn marks holes chips or tears along the valve. If it is still hard to turn tap the valve slightly with a hammer and place a pipe wrench around the handle to turn it position a rag between the handle and wrench to keep the wrench from chewing. The three ways to fix your leaking drysuit exhaust valve.

Metropole Flush Valve Regular 40mm Size Concealed Body with Exposed Shut O ff Provision. You must check dimensions in photo to check compatibility. Inflate the sleeping pad and submerge it in the soapy water bath.

How To Repair Metropole Flush valve - YouTube. With the tap disassembled loosen the valve with a spanner and replace the washer or ceramic disc and then put it all back together.

Theres a difference between a valve that is genuinely stuck and a valve that is in serious need of replacement. Replacing a flush valve involves removing the toilet tank replacing the valve and then installing the tank. Corrosion resistance and Robust construction.

Isolation Valves and Service Valves How to fit an Isolation Valve to Water Pipes so That Appliances can be Disconnected From the Water Supply Quickly and Easily. Use the wrench to remove the cartridge retaining ring. Wait two minutes then use your hands to wiggle the valve back and forth.

This is something that would most likely occur after a repair of the valve. At this point you might be better off trying to spray some WD-40 or similar lubricant on the valve. A distorted valve body can also cause sluggish spool response.

If you have water leaking from the spout of a compression faucet youll need to replace a washer or a corroded valve seat. A valve thats very badly stuck wont usually turn easily without some help. You may need to clean the valve seating to remove any deposits.

If water leaks even when you press the flapper to close properly then you must check if the water is leaking through a crack in the overflow tube. If after all that theres still a leak check the O-ring seal for signs of wear and tear as this may need replacing. Size40mm 15 220g Height100mm.

If this doesnt work and the valve still leaks on your next dive try taking it apart to flush it out with water in case there are any foreign objects like sand that are preventing the seal from closing. Schedule Orientation Centre Visit. While reversing valves rarely ever get broken it still happens.

How To Repair Metropole Flush valve. Remove all system pressure from the circuit. Attempt to turn the valve handle again by hand.

You can easily fix a leaking drysuit exhaust valve by clicking the valve down by a couple of clicks. Keep spinning until it gets tighten enough. The finishes depicted here are only indicative and may differ from that on the actual product.

Although it looks like too much work it is actually a simple task which you can easily do without calling a plumber. If your Flush leaking or wont shut off then you may just need one of these substitute instead of having to replace the whole expensive Flush. Retighten the bolts in steps of 25 and using a crisscross pattern.

This will stop the leak. Check whether there is the production of bubbles at the air valve. Repairing a leaky compression faucet most often involves replacing a washer.

Such a complaint can be. Shut off the cold and hot water valves under the sink. Start by detaching the valve entirely from the body.

To install the new valve core follow the same process of removing the valve core but this time youve to rotate it clockwise always maintain the correct specification. To correct this loosen all of the mounting bolts to relieve tension on the housing. Squirt lubricating spray where the valve handle enters into the valve and wait 20 minutes.

Repairing the Air Valve. You might be able to see the rust fall off and get the shaft to loosen up. Carry out a valve test and repair as below.

Check if the tire bead is providing a perfect balance or not. Step-by-step guide to fitting an isolation valve. Theses shut off valves can make plumbing maintenance easier.

Remove the button and screw that holds the handle in place. Usually when the fill valve goes bad on your toilet you will hear the sound of water constantly running. The hardest part about changing a washer in a leaking compression faucet is.

Metropolevalverepairinghello dosto is video me Maine aapko metropole valves repair karke bataya hunn agar video accha lagato like kariyega comment kariyega. Do a few wheel rotation move.

Friday, July 23, 2021

How To Repair A Leaking Toilet

Lift up the toilet cistern lid to check if the water is on or off. The more complex fix.


How To Tighten Water Supply Line Connectors Leaking Toilet Toilet Repair Toilet Tank

To check for leaks start at the top of the line near the toilet and run a dry rag slowly across the line.

How to repair a leaking toilet. ID parts and problems with this handy guide and hit the hardware store with confidence. To remove the toilets plastic bolt empty it and then use the appropriate-sized wrench to unscrew the hose. You will need to turn off the water supply at the shutoff valve in order to replace the inlethose.

Stop your toilet tank from leaking without the help of a professional toilet repair. If you confirm that the tank is leaking then go ahead and turn off the water supply valve under the toilet flush the toilet and sponge-dry the inside of the tank. Then take off your cisterns lid.

Determine the Cause of the Leak Credit. The steps to fix toilet leaking from the bottom are removing the tank lid and looking for obvious problems such as a cracked or corroded bowl. One of the leading causes of leaky cisterns happens when the washers need to be replaced.

To make it easy to follow weve decided to list the reasons your toilet might leak from simple to complex. A toilet that leaks or runs is an easy homeowner fixif you know how to diagnose the trouble. Now take a white rag or tissue paper and place it under the tank bolts.

Know Your Parts to Fix a Leaking Toilet Refill Tube Illustration. Reinstall the tank bolts gaskets and nuts alternately tightening the nuts from side to side so they tighten evenly. To fix a leaking toilet you will need a plunger toilet bowl cleaner with bleach towel rubber gloves screwdriver toilet bowl gasket kit pipe wrench and plumbers putty.

If the color changes you know the toilet tank is leaking. After making sure the water is off put something under the leaking pipe to catch the water a bowl will do the job and have a towel or a rag to wipe the floor. Check the black pan connector rubber around the toilet for leaks.

First turn off the water valve. Repairing a Leaky Toilet Tank. Although it is less common to find a leaky shutoff valve the internal threads can wear out and become difficult to turn.

Hopefully you wont need to read long before you find your problem. The washers for your toilet cistern are at the very bottom of the toilet tank. This should do a pretty good job of helping you determine exactly where the leak is but if youre still having trouble you can always swap out the dry rag for your finger.

If the leak is bad locate the stop cock and turn the main water off by turning clockwise. A leaking toilet waste tube rubber will cause the water to leak. Make sure to place a towel down under the pan rubber so it doesnt leak all over the floor if you do have a leak there.

How to Fix a Leaking Toilet. Install the new spud washer over the flush valve tailpiece and place the toilet tank back on the base. Or like this.

S Trap toilet pan test- Make sure the toilet tank is full.

Tuesday, July 13, 2021

How To Metropol Toilet Flush Valve Repair

Try to twist in a counterclockwise motion the fill valve and lift to remove it. First carefully remove the tank lid.


How To Fix A Leaking Toilet Full Details Flushing Toilet Review Toilet Repair Fill Valve Leaking Toilet

You need to remove the lid to reach the flapper at the bottom of the tank.

How to Metropol toilet flush valve repair. Start to loosen the nut by turning it counterclockwise with your pliers. Remove the float mechanism from inside the cistern and open the valve to get at the seal. The specific flush in use has a bell with part number 240.

You can repair a minor leak by emptying the tank drying the valve and spreading silicone grease on the valve seat and flapper to create a better seal. Ensure that the end of the flush handle has fitted well into the slot on the flush valve. Return the rubber washer seal to the outside of the retaining nut.

Underneath the gasket youll see a large plastic nut. Fix the new flush valve into the toilet hole inside the toilet tank. Detach the two rubber bolts next to the sides of the flush valve.

With the water supply being switched off it wont refill again. Most dual flush toilets come with zip ties which keep in place the overfill tube. Flush the toilet and leave the handle down until all the water drains into the toilet.

Flush the toilet to test its operation. Grip the seal and pull it gently out of the float valve. If you arent sure if the flush valve is.

Replacing a flush valve involves removing the toilet tank replacing the valve and then installing the tank. Fixing the Zip Tie that Was Broken. Usually flappers detach usually one of two ways.

Although it looks like too much work it is actually a simple task which you can easily do without calling a plumber. Begin unscrewing the flush valve. This seal is normally made of black rubber.

Make sure the curved part of the rubber seal is pointed away from the toilet tank. I followed the steps provided to dx the problem. If you notice any leaking tighten the fittings slightly until the leaking stops.

Geberit Toilet Flush Repair. Replacing a fill valve or a toilet flush valve is sometimes needed to fix a running toilet and a toilet that leaks at the base might require Reply. Loosen and remove the plastic nut to remove the flush valve.

Youll need to flush out the water left in the toilet tank. Turn on the water allow the tank to fill and then check the bottom of the toilet for leaks around the tank bolts and around the coupling nut on the fill valve. ScopeThis instructable is about fixing a specific symptom described below on a Geberit in-wall toilet flush with two separate buttons for flushing with a smaller or larger amount of water.

Fix the valve to the tank using a retaining nut and tighten it with a pipe wrench. Here is a quick step-by-step guide on how to replace your toilet flapper on your own. If youve established your flush valve needs to be replaced first shut off your water supply to the tank.

If you can notice any debris try to remove using tweezers or toothbrush. You can then recap the valve and turn the supply of water back on. Grab a sponge or old towel to mop up any remaining water left in the tank.

Thank you for this video. Locate and remove the flush valve. Place the tank lid a safe distance away so it doesnt fall over while you are working.

Locate the thick conical rubber gasket and remove it. Next disconnect the chain from the handle. Unscrew the float mechanism from the water supply valve outside the cistern using adjustable pliers.

November 20 2020 at 1007 am.

Friday, July 9, 2021

Wooden Floor Water Damage Repair In A Bathroom

Another option is to tear-out the wood that is wet and replace it. If playback doesnt begin shortly try restarting your.


Easy Tips Removing Water Damage From Wood It S Works Flooring Cleaning Hacks Cleaning Painted Walls

Dealing with a water damaged wood floor doesnt have to be hard or cost a lot of money.

Wooden floor water damage repair in a bathroom. How to repair water damaged bathroom floorquick fix. Take a look at the floor joists and figure out which ones are on either side of the water-damaged area. The water can even cause the glue on the tiles to be destroyed.

Stop your floors from buckling by taking care of cupping and crowning at the first sign. You can test if the finish layer is still intact by dropping a small amount of water on it and waiting to see if the water beads up or is absorbed into the wood. Keeping the floors finish layer strong and intact is vital when you have hardwood flooring in a bathroom.

If you have wood floors the water can damage them so badly by creating a black in color finish if the water seeps in deep enough. In this video we take fix the dry rot and water damage in teh load bearing w. You may sand refinish and re-coat the wood floor to repair water damage but is not a permanent solution.

In cases of serious water damage and wood rot that has taken over all your subfloor in the bathroom replacing is the safest route to go. With solid hardwood floors you can sand and scrape away up to a quarter of an inch off the wood to remove water damage on the surface. Use a pencil and a straightedge to draw a line through the middle of each neighboring joist and use a carpenters square to connect those lines creating a.

Following these steps may help prevent you from having to replace your existing hardwood and install brand new flooring. Take a few minutes to learn how to repair water damaged wood floors. Inspect the area.

In most cases you can handle the work yourself. When replacing planks be sure to sand them to resemble the current flooring and find a matching stain color. The best way to avoid and fix water damage for wood floors is to get them repaired.

If you have a room prone to excess moisture install a dehumidifier to keep the water level in the air regulated. If certain boards need removing youll need to find and purchase matching wood. This type of flooring can also have replacements for individual planks.

Running a fan or small dehumidifier on your own can decrease the time it takes to dry the floor out. For small-scale wood floor water damage you may be able to nail or screw warped boards back into place. Still there are steps you can take to save them.

This is your first line of defense and it will need to be reapplied every few months. BZ PHS ANGLE 5Fixed. How to repair water damaged bathroom floorquick fix - YouTube.

This allows the floors to be fixed right away and may be cheaper than paying for them to be dried out. How much does it typically cost to repair a water damaged bathroom floor. Wooden floor water damage repair in a bathroom - YouTube.

Cover your wood floors with plenty of rugs as its easier to dry cotton than wood. Water damage floor repairs will vary depending on the type of flooring. When wet wood begins to grow a certain type of fungi that feeds off of the moisture which in turn destroys the wood as it does so.

Various things such as the size of the area of your bathroom floor the extent of the damage and exactly what kind of damage has occurred all factor in to the overall cost of having water damaged floors repaired professionally. Once wood has begun to rot the damage is irreversible. Ridding your home of mildew and mold can prove to be quite a task and often times means replacement of the floors.

Replace Dry-Rot and water damage in an exterior wall and subfloor of bathroom. Now that you know the signs of water damage you can catch it earlier. For this you will have to take out the affected planks and replace them with new boards.

But if you do get water on your wood floor all is not lost. On average most water damaged flooring repair ranges from 450 up to 7000. How to Prevent Damaging Your Wooden Floors.

Repairing a damaged wood floor can cost more than 1000. Whether it was due to flooding heavy snow or just a leaky pipe water damage to hardwood flooring happens.

How To Install A QuietFILL Complete Toilet Repair Kit By Korky

1 DANCO Universal Toilet Tank Repair Kit. The Korky QuietFILL Platinum Toilet Fill Valve is quieter than other fill valves. Adjustable Ul...